We recently purchased the Andersen Equalizer hitch system. Before that I was using a spring bar tension hitch that was OK but as the commercials say, OK is not good enough.
The Andersen Equalizer hitch is phenomenal. I no longer get pushed around as semi’s pass me on the highway. Connecting and disconnecting the hitch took a little getting used to and then a little modification. I added the chain binders below to make my life so much easier.
The process involved purchasing a few pieces of hardware to go with the chain binders and Equalizer. I went to my local hardware store and purchased:
- 2 – 3/8″ chain 5 links long
- 2 – 3/8″ quick links
- 2 – S-hooks
To add the chain binder into the system you’ll need to create a “break” in the chain that connects the hitch to the trailer.
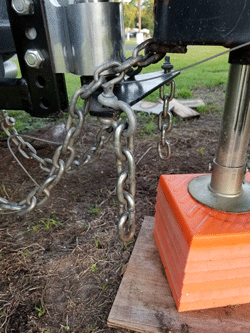
I opted not to cut the chain that comes with the Andersen Equalizer but rather to add a small piece of chain to the hitch side of the linkage to introduce this break. This piece of chain is attached to the screw pin shackle that comes with the Andersen Equalizer and was purchased from my local hardware store.
The picture to the left show the piece of chain attached to the hitch portion of the Equalizer. A 5 link piece is what was needed for my installation.

Adding the “break” in the chain connecting my trailer to my hitch is all that’s needed to use the chain binders to quickly hook up or disconnect. However, the last thing I would want is to have the chain binder come loose while I’m driving down the road. I added a safety feature to prevent the binder from being able to open on its own.
The first step was to drill a hole in the handle of the binder. They come with a slight indentation near the end of the handle. I don’t know if this was supposed to be a hole or not but it was the perfect candidate for becoming a hole. Drilling was a little time consuming. It was either the hardness of the metal or the sharpness of my drill bit (or both). Once done I added the S-hook as in the picture to the right and closed the end together with pliers.
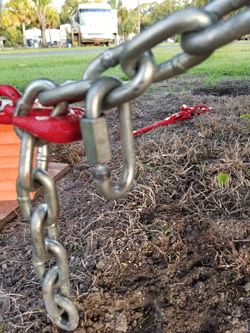
The next step was to add the quick link to the chain that is attached to the trailer. This would be used to secure the free end of the S-hook to the main chain thus preventing the chain binder from being able to open.
I found that 9 links form the end was the sweet spot for my installation. Leaving a link between the quick link and my binder put my binder hook at link number 7. This may vary depending on how you connected the Equalizer to your trailer. But, I always connect to this link which provides me with the correct tension on the Equalizer.
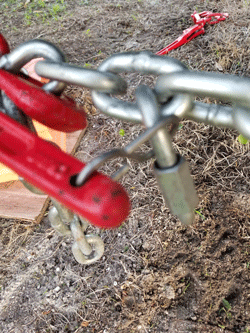
After closing the chain binder I take the loop that was created out of the S-hook, place that loop in the quick link and close the quick link. The binders cam closed after a certain point so it’s unlikely that it would have come open and once the S-hook is in the quick link there’s no way it could inadvertently open.
On a side not, you’ll want to add a little WD-40 to the quick link from time to time to make your life easier. Dirt from traveling will get on the threads of the quick link and make it difficult to loosen with just your fingers. You can use pliers or a wrench but that adds extra time.
Now, we connect in a matter of a few minutes. Actually, our setup/tear-down time has dropped dramatically to about 10-15 minutes depending how hot it is outside. That’s leveled, stabilized, sewer hoses, water and cable connected. Due in part to the modification that I made to the Andersen Equalizer using the chain binder and hardware discussed above.


8 thoughts on “Make quick work of hooking up”
Great post. I am experiencing many of these
issues as well..
An outstanding share! I have just forwarded this on to a colleague who was conducting a little homework on this.
And he in fact bought me breakfast due to the fact that I found it for him… lol. Տo ⅼet me reworⅾ this….
Thanks for the meal!! But yeah, thanks for spending the time to taⅼk about this issue.
Great info. Lucky me I came across you’re website by accident.
I’ve saved as a favorite for later!
I am really happy too glance at this web site posts which includes tons of valuable information, thanks for providing these kinds of data.
Hello There. I found your blog using MSN. This іs a really well written article.
I’lⅼ make sure to bookmark it and return to read more of your useful information.
Thanks for the post. Ӏ will certainly return.
Amazing! It’s actually a very remarkable post. I have a much clearer idea concerning this topic.
Hello, just wanted to tell you, I enjoyed this article. It was funny.
Keep on posting!
Good article. I will be experiencing many of these issues as well..